
The AI bookkeeper
Billsy uses the latest large language models to eliminate the data entry of bills. Drop in an invoice, credit note or statement — Billsy reads it and enters it straight into Reckon Accounts Hosted or Xero, then archives a searchable PDF in your Google Drive.
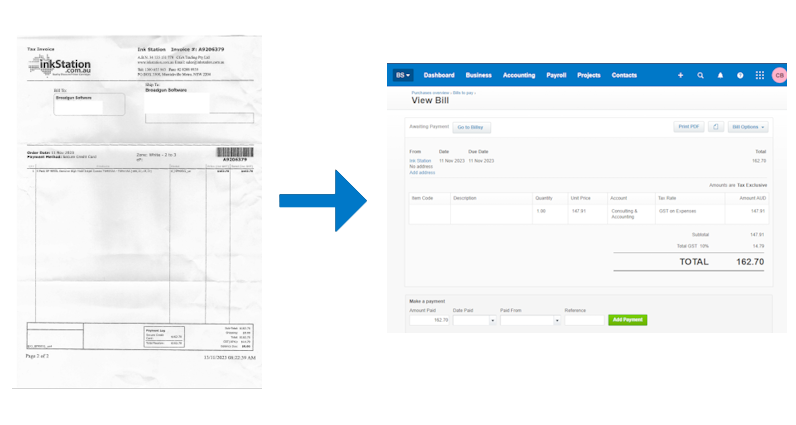
Billsy is an AI bookkeeper for small and medium businesses. It turns the tedious job of typing bills into your accounting system into a couple of clicks. Invoices are uploaded or simply emailed in, read by AI, quickly validated by a human, and pushed into your accounting system — with the original document archived as a searchable PDF for easy retrieval later.
The latest large language models extract the vendor, invoice number, dates, totals, GST and line items — even from complex, multi-page or handwritten documents.
What used to be minutes of typing per bill becomes a quick glance and confirm. Billsy highlights exactly where on the page each value came from.
Scanned, image-based PDFs are turned into correctly rotated, de-skewed, searchable PDFs and stored in your own Google Drive for archival.
Everything Billsy does to take bookkeeping data entry off your plate.
From a pile of paper to posted bills in five steps.
Gavin Ma and Co + bill + 2022-10-21 + 221075 + AUD + $135.00 + $1,485.00.pdf — with a
link back from the transaction memo in your accounting system.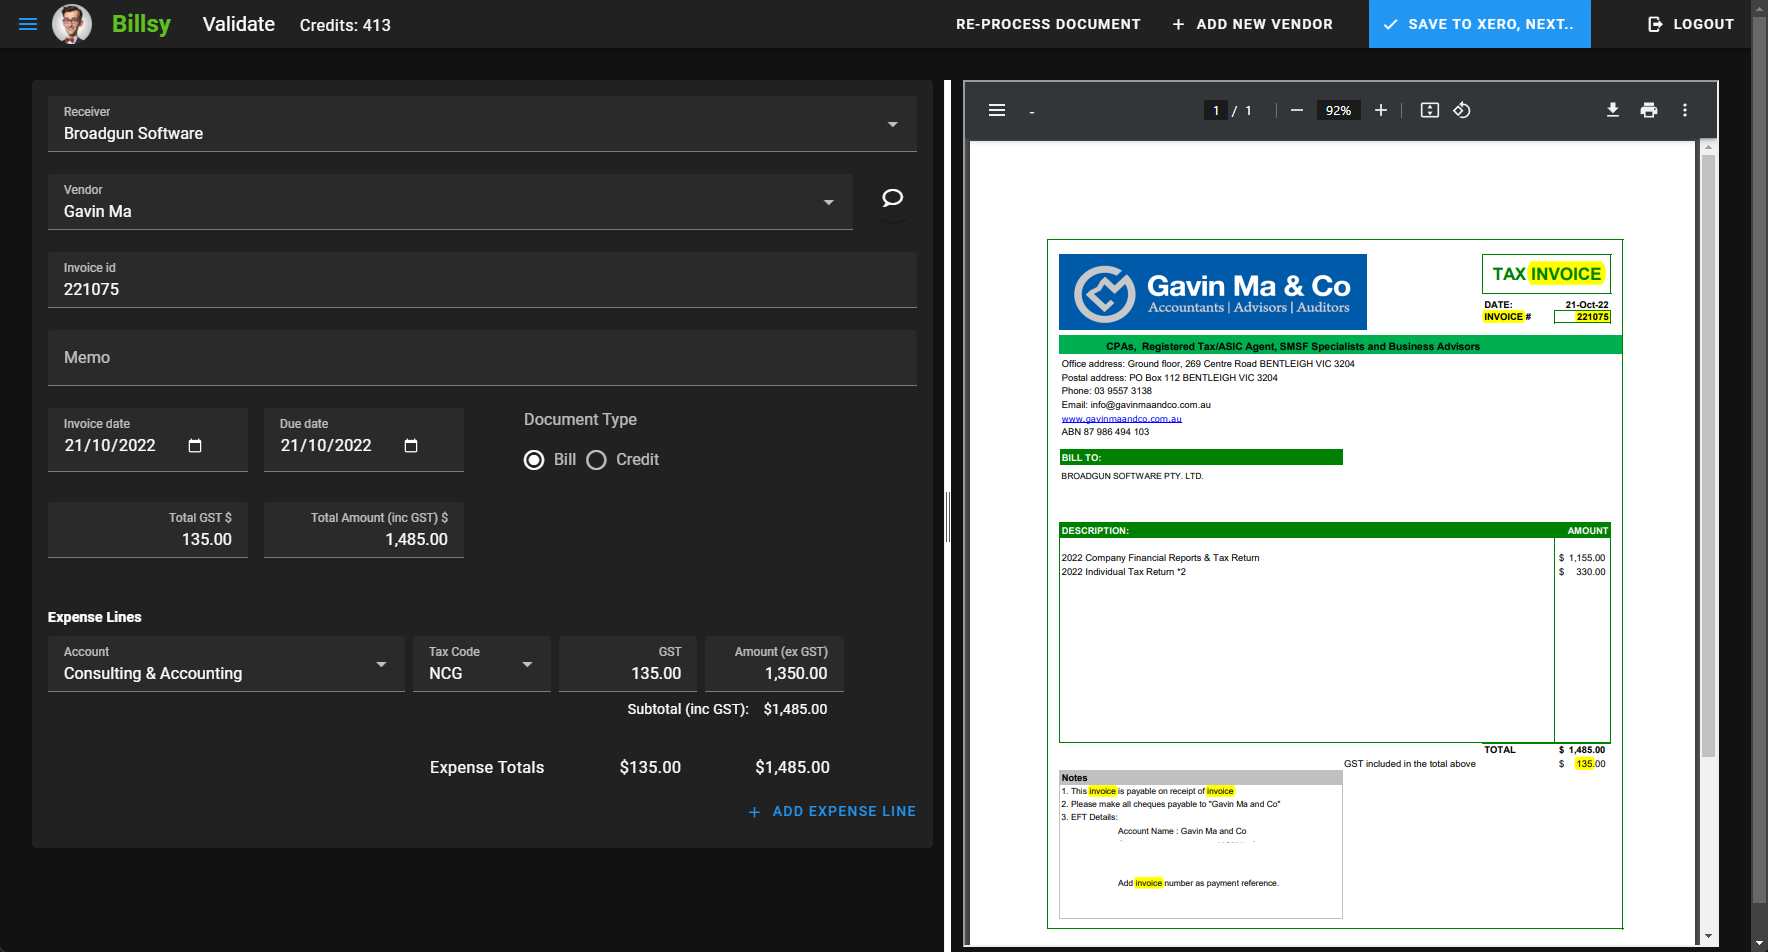

Most of the time Billsy figures things out on its own. When it needs a little help, you can tweak the AI with vendor-specific hints in plain English, for example:
Billsy turns scanned, image-based PDFs into correctly rotated and de-skewed searchable PDFs using Optical Character Recognition (OCR). The documents are stored in your Google Drive account — great for archival, with Google's powerful search to find documents down the track. Relevant text (invoice id, total, GST and more) is automatically highlighted to show where each value was taken from.
Billsy connects directly to your accounting system and creates bills and credit notes for you.
 Reckon Accounts Hosted
Billsy logs in to Reckon Accounts Hosted, lets you connect a company file, and writes bills straight into the "Enter Bills" screen — supplier, reference number, amounts, tax code and a memo linking back to the archived PDF in Google Drive.
 Xero
XeroValidated documents are pushed into Xero with a single "Save to Xero" click, including the account, tax code and GST.
Watch Billsy in action and learn the first-time setup steps.
See an invoice uploaded, read by AI, validated against the highlighted PDF, and saved to Xero.
Welcome to Billsy. I'm about to upload an invoice and let Billsy do its thing.
It takes a second or two to process it, and Billsy extracts these columns out of the invoice. We click on validate, and we can check that everything's okay. Notice the fields are highlighted in yellow — that happens automatically. Everything seems in order: the total amount matches up, and the GST matches up. It's automatically picked the correct account and the correct tax code. We go ahead and save it. Job done.
A full round trip: upload a bill, watch it land in Reckon Accounts Hosted, and open the searchable PDF that Billsy filed in Google Drive.
This demonstrates how Billsy will upload an invoice and its extracted fields into the Reckon database. First, I'll select the invoice and show it to you in Acrobat Reader so that you can see which invoice we are uploading and the different fields, and then proceed with the upload.
It's processing. When it's finished processing, we have a look at the list that was uploaded, and you can see that the AI has extracted those fields from the invoice.
We'll validate it, just in case anything wasn't right. You can actually see the invoice, with the data highlighted in yellow where it was extracted from, and on the left you can review and edit if necessary. The account is also correctly chosen. And so we just save.
Now we need to have a look in Reckon and find the invoice, so we access Reckon and find it.
You can see that the correct fields have gone in — the correct account and amount. You can also see that there's a URL that links to the actual invoice. So we copy that and have a look, to show you that it's actually stored in Google Drive as well. And there's the document.
And that completes the demonstration.
In Reckon Accounts Hosted: open Company → Users → Set Up Users and Roles, click New…, create a user named "Billsy", give it Full Access, and confirm.
Log in to your desired company file in Reckon Accounts Hosted. Navigate to the 'Company' menu, then 'Users', and select 'Set Up Users and Roles…' to access user management. In the 'Users and Roles' window, click the 'New…' button to begin creating a new user.
Enter the desired user name — 'Billsy' in this case — and set a password in the 'New User Name and Password' dialog box. Select 'Full Access' from the list of 'Available Roles' and click 'Add' to assign this role to the new user. Click 'OK' to confirm the creation of the new user with the assigned role. The newly created 'Billsy' user with 'Full Access' is now visible in the 'Users and Roles' list, and the window is closed.
From the Billsy menu open Companies, log in to Reckon with your numeric user ID, add a + New Company, choose "Reckon Accounts Hosted", pick the company file, enter the Billsy Reckon user name and password, and save.
I'm starting by opening the menu in billsy.ai. Next, I navigate to the 'Companies' section in the menu. I'll log into Reckon by entering my numeric user ID and password in the pop-up window. A Windows security prompt appears, so I'll enter my PIN. Now I click 'Sign In' to complete the Reckon login process. After successful login, a message confirms the window will close automatically.
Back in billsy.ai, I click on '+ New Company' to add a new company. I select 'Reckon Accounts Hosted' as the Accounting System from the dropdown. I'm entering 'Broadgun 2' as the name that is most likely to appear on bills for this company. From the 'Reckon Company File Path' dropdown, I choose the correct company file. I then input 'billsy' into the 'Reckon File User Name' field, and the password. Finally, I click 'Save' to connect the company file. We see a 'Connecting to company file…' message while billsy.ai establishes the connection. The new company is now successfully added to the list.
Create and share a Google Drive folder (or shared drive) so Billsy can archive your searchable PDFs.
I'm going to walk you through setting up Google Drive so it works with Billsy, so Billsy can save documents in your Google Drive.
Once you log in to Google Drive, you'll see there's a My Drive — that's where shared folders can be set up. If you have a business account, you'll also have the Shared Drives section. If it's just a personal account, you probably won't have Shared Drives, so you'll be limited to shared folders.
First, I'll show the shared folders approach. We right-click on My Drive, new folder — it's created. Right-click on the Billsy folder, select share, paste in the Billsy email address, and make sure we have editor permissions. That's all we have to do.
Now I'll show you the shared drive approach. Right-click, new shared drive — there it is under Shared Drives. Right-click and select manage members, add the Billsy email address, and make sure it has content manager permissions. And that's, once again, shared.
Now we have to tell Billsy the ID of the shared drive. If we double-click on it, you'll notice up in the URL that's the folder ID. We copy that, go back to Billsy → Settings → Google Drive settings, paste the folder ID in, and save. That's all we have to do.
Getting started with Billsy and Reckon Accounts Hosted.
In Reckon, make sure you have a Reckon user (named "Billsy") created with full admin rights. Open Company → Users → Set Up Users and Roles…, create the new user and assign it Full Access. (See the "create a Reckon user" video above.)
Log in to Reckon from Billsy using your Reckon numeric ID (not your username), then add the company file to Billsy from the Companies screen. (See the "connect a Reckon company file" video above.)
Set a Google Drive shared-drive folder so your processed PDFs are saved and searchable. Without this, PDFs are not retained after processing.
Choose Upload documents from the main Billsy menu, pick the receiving company, locale and currency, and upload your PDFs — or email them in.
All plans include unlimited users, a remote training session, online chat & phone support, and AI prompt-engineering assistance. Prices are per month in AUD.
Choose a plan and enter your name, email and organization name. For the free plan you'll receive a registration code by email; paid plans continue to secure checkout (payments are handled by Stripe and PayPal — Billsy never sees your card number).
Craig Broadbear
Email: craig@broadgun.com
Phone: +61 3 9028 5252
A product of Broadgun Software Pty Ltd, an Australian company.
Billsy (billsy.ai) is developed by Broadgun Software Pty Ltd, an Australian company, founded 2024 by Craig Broadbear. Broadgun adheres to the Australian Privacy Principles (Privacy Act 1988 (Cth)) and, where applicable, the EU GDPR.
Billsy may use the Google Drive API to store documents in your Google Drive account, the OneDrive API to store documents in your OneDrive account, and large language model APIs (including the Gemini API) to process documents. Online payments are handled by Stripe and PayPal; Broadgun never has access to your credit card numbers.